Monday, November 28, 2005
Black Sunshine Friday...
I had been playing phone tag with the aforementioned 4-year-olds' father for a few days. I was surprised when my cell phone rang at around 6:30 AM Friday - It was him, and he seemed to be in some kind of stupor. I finally pieced together that he decided to go to Staples first thing Friday morning to get some unbelievable deal they had advertised in their flyer. The store opened at 6 AM, he arrived at 6:05, and they were already sold out of the item he wanted. This put him in an understandably foul mood, and, after telling me he would be around all weekend, he mumbled something about going back to bed and hung up.
This set a foreboding tone for the morning - I picked up a paper Thursday, because although I hate shopping, I love looking at all the shiny new stuff in the ads (this goes back to when I was a kid, when I would drag the Sears Wish Book out onto the living room floor and leaf through it for hours). Now, when I say I hate shopping, I don't mean I merely dislike it - depending on the store and the time of day, I get anxious and start sweating and can't look anyone in the eye and can't communicate beyond monosyllabic grunts until I GET THE HELL OUT OF THERE. I think it's that I have just a touch of agoraphobia and social anxiety and, combined with a genuine hatred of good-'ol American zombie-like consumerism, the average retail store creates a perfect storm of triggers. Wal-Mart & traditional shopping malls are the worst - I've only set foot in a shopping mall once in the past seven years. This isn't as much of a problem as you might think, since the Midwest is essentially one giant strip mall these days. However, I am, above all else, cheap - so when I saw some Pioneer bookshelf speakers that I had been drooling over on sale at Circuit City for ten bucks, I decided to swing by after getting off work at 7AM.
The parking lot was packed, but people were coming & going at a pretty good clip, so it didn't take long for something to open up. Walking in, I overhead someone ask an employee if they had any more of a particular digital camera left- the salesman said, "No, we had people getting in line at ELEVEN O'CLOCK LAST NIGHT for those". Jesus, people, it's JUST A CAMERA. It was FOURTEEN DEGREES out Thursday night. Act like you've got some goddamn dignity.
Luckily, the department I needed was relatively deserted (people were mobbing the DVD section) and the speakers were in stock, so the transaction was relatively painless. I did have to pay in the stereo department and go to the "customer pickup" window to get the speakers, and the two teenagers running back and forth to the warehouse looked like they were stoned to the gills and just barely keeping it together. I guess that's one way to deal with it...
Monday, November 21, 2005
Raised on Radio
On another note, I picked up a Sirius satellite radio the other day and have been playing around with it - pretty cool. (And no, my decision to go with Sirius over XM had nothing to do with Howard Stern - Sirius has NPR & BBC, XM doesn't). I've been thinking about it for a while, and they finally got cheap enough ($39.95 + a $10 mail-in rebate) that I decided to give it a shot. It's pretty cool, but on some level it's a really bad idea - you're giving me hundreds of channels of music and a remote control, allowing me to flip through the channels while I drive. I almost rear-ended a cop today while playing with it. And using the suction-cup mount to put it on the windshield next to my phone, my dashboard is starting to look like the Starship Enterprise. Just wait 'till I get the GPS unit for my Treo, I'll be a freakin' Circuit City on wheels.
One cool thing about it - I bought the Starmate receiver, which comes with all the car goodies and a built-in FM modulator (good thing, because the el-cheapo $50 CD player I have in my car just decided to stop ejecting CD's - I've been listening to Blast Tyrant for 4 days straight). I was going to buy the home kit, but they were out of stock. I'm glad they were, because the Sirius web site allows subscribers to listening to streaming audio from any computer. Cool. Now I just have to find a pair of speakers small enough to smuggle into work...
Sunday, November 20, 2005
Project Files: Operation Rolling Dumpster
One great thing about the Internet is that is bridges the void that exists between members of a sub-culture - for example, living in the Midwest, it is hard enough to find a vintage Volkswagen that still runs, and "clean, rust-free" examples don't exist here. That is not the case in the West and parts of the South, where many VW's can still be found on the road as daily drivers. One thing you can say about VW owners, they have embraced the Internet with unparalleled enthusiasm, as shown by such web sites as The Samba and the Type II mailing list.
One of the common problems with vintage VW's is that they are like driving a noisy icebox, due to the lack soundproofing & insulation. Many people have addressed these problems in their own way (it is a source of perpetual discussion on the mailing lists) but the definitive guide was written several years ago by a man named Matthew Bulley, who authored a very detailed website regarding his solutions to the problem. Unfortunately, several years ago Mr. Bulley's site disappeared from the Internet, but Jason at shagadelic.org was kind enough to rescue a copy from The Wayback Machine and host it on his servers. (You really should read it first, or this post won't make nearly as much sense. Besides, it's much more entertaining that you would expect). What follows is my attempts to complete an abbreviated version of Mr. Bulley's instructions. Why abbreviated? Well, two reasons: 1.) The original directions are very detailed and labor-intensive, and 2.) I am lazy. Also, I plan to renovate the interior of the Bus pretty extensively in the future, so it would be pointless for me to get too involved. Yeah, that's it... always thinking ahead.
The first step was obtaining the materials: First a product sold through JC Whitney (yeah, I know) as "NASA insulation":
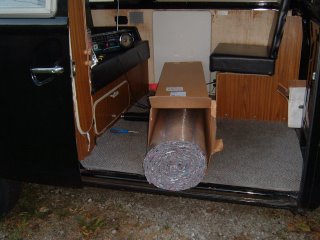
Big hoarkin' roll of insulation.
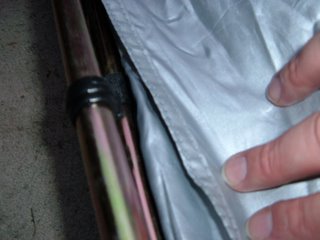
(Note: Does anyone else find the idea that NASA uses products available at JC Whitney somewhat disquieting?) This stuff is made of ground-up chunks of foam (I'm guessing it's a way to put leftovers and odds-n-ends to use) bonded to a foil backing, with a grid of fiberglass mesh sandwiched between them to prevent it from falling apart. I don't know how much it helps structural integrity, but it sure makes it a bitch to cut. Here's a shot showing the back of the insulation:

The second major component is some type of soundproofing material:
Soundproofing, compliments of eBay.
This material is made of an asphalt emulsion bonded to a heavy-duty foil backing. The other side has a peel-off liner covering a self-adhesive coating:
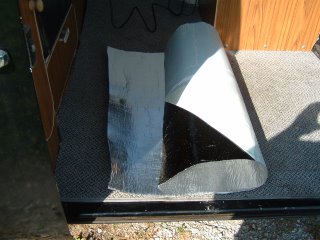
I used to use this stuff a lot in high school, when high-end car stereos were my primary hobby. Back then it was only available under the brand name Dynamat, and it cost a fortune. Now there are many other brands, such as Roadkill, Brown Bread, and assorted generic varieties that all work well. Just search for "car soundproofing" on eBay and you'll get plenty of hits - just watch the shipping costs, they're a killer.
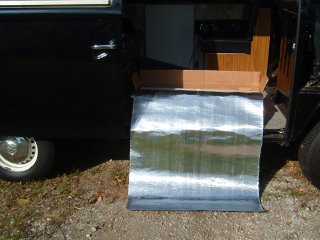
The basic idea is simple - peel the backing from the soundproofing, heat it up with a heat gun, and stick it to any exposed metal. I used a cheap heat gun I purchased from Harbor Freight (Harbor Freight & JC Whitney in ONE project?!?! Boy, I am doing my reputation wonders...) After that, use some 3M spray adhesive to attach a section of the NASA insulation over top of that. In theory, things are a little more time-consuming, all of that material needs to be cut to fit, and both the soundproofing and the insulation will destroy a high quality utility knife in short order. All in all, I spent the better part of three days crawling around inside the bus, and my hands were raw and bleeding when I finished. I tried to wear gloves, but they slowed me down too much, so I sucked it up.
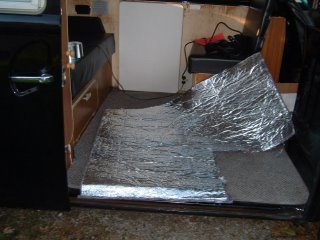
Cutting the insulation for the passenger compartment.
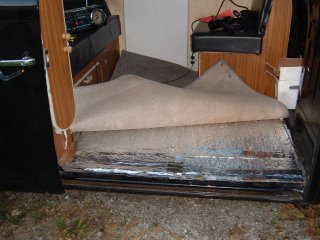
 The rear compartment before...
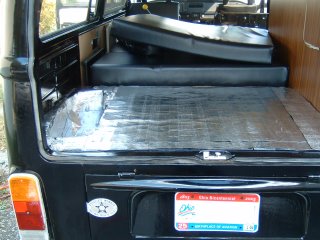
...and after. This area got two layers of soundproofing, since it is directly over the engine.


...and insulation...
...as does the storage area under the rear seat.
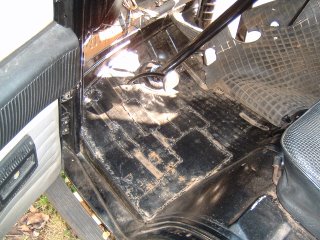
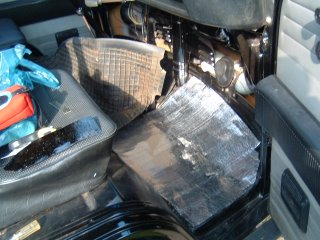
The drivers' compartment floors "before". Note the blobby Frankenstein welding job by a previous owner to repair the floors.
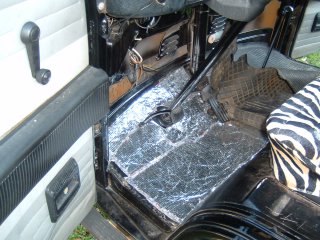
...and after.
Passenger side also gets soundproofing...
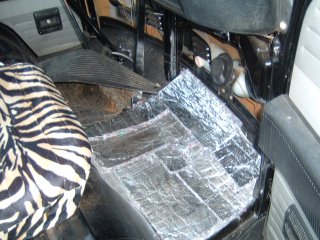
...and insulation.
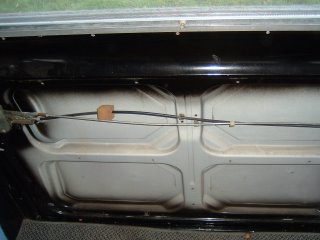
Interior of the sliding door before...
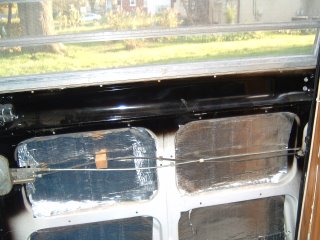
...and after. Several small patches were used here instead of one large one. Insulation was bonded to the wood paneling instead of the door itself.
...and that's about all the pictures I have. One detail I left out was that I used foil tape to seal the edges of the insulation to the soundproofing. I am pretty much to the end of the insulation, but have a bit of soundproofing left. It is definitely quieter than before, but I still have to do the entire interior wall on the drivers' side. That will require removing most of the interior, so I am waiting until I get to the bulk of the interior renovations for that. I would also like to insulate the roof, but I am playing with the idea of replacing it with diamond-plate steel... don't tell the VW guys, as the original whitewashed birch wood paneling is highly prized among purists.
If you read Bulley's article, there was a lot of detail about refurbishing the factory heating system so it does a better job. This is not an issue for me, since I don't have a factory heating system. Nada. None. Seems it was entirely removed by a previous owner (this is actually pretty common, as the VW heating systems were inefficient when poorly maintained, as most were). I have a portable propane heater in there now, but will try to piece together a new system when the new engine goes in.
Saturday, November 19, 2005
Pavo cristatus
Friday, November 18, 2005
Cyanoacrylates are hand-y...
I realize as I write this that there are two kinds of people in the world: Those that completely understand the set of circumstances that could lead to this and sympathize with me, and those that think the above sentence proves I am irrevocably batshit insane.
Discuss amongst yourselves.
Wednesday, November 16, 2005
Product Review: Cycle Shelter
Storing a bike when you don't have a garage is always a pain (unless the bike is a piece of shit, then you don't really care). However, my bike is not a piece of shit, and I'd like it to stay that way. In previous years I stored my bike at my parents' house, a couple of towns over. Due to a whole lotta reasons I won't go into right now, the bike was stored there for the better part of two years. Although it was in a garage, since I wasn't able to wash it or polish the copious amounts of chrome semi-regularly, there was some pretty bad oxidation in some places, to the point where a few pieces needed replaced (the old pieces will probably become an experiment with home powdercoating - stay tuned). I decided that I would need to find a storage solution that would allow me to store the bike securely, but still have it on the premises so I could give it some attention every so often (not to mention the occasional ride, should the temperatures rise to an acceptable level).
After some poking around on teh intarnets, I found the CycleShell enclosure. I thought it looked like a great idea (still do) but there were a few cons:
1.) It's pretty expensive ($375 for the size I needed):
2.) Shipping is pricey ($80 to a private residence - cheaper to a business address):
3.) There is a 2-week wait, as each one is custom-built.
I went to some of my favorite motorcycle forums and explained what I was looking for, and asked if anyone had any recommendations. I was told about two other covers I hadn't heard of before: The Bike Barn and the Cycle Shelter. The Bike Barn was ruled out almost immediately, as it doesn't have a "floor" - they claim that it is unnecessary, but I live right by a busy road with a perpetual construction site across the street, and EVERYTHING on my patio gets coated with dust in short, even if it's covered. I found the Bike Barn more interesting- it didn't look quite as sturdily constructed as the CycleShell, but it was available immediately for a lower price and was cheaper to ship. As money was a little tight that month, I decided to go with the Cycle Shelter.
Note: Originally I had a fairly pricey Dowco cover for my bike, but after a few seasons (and some run-ins with some territorial stray cats - ick) I decided to try washing it, and it dissolved in my washing machine. Since the summer I had been using a cheap & way-too-big cover I picked up at Sprawl Mart for fifteen bucks:
It turned out to be a good time to change covers, as the lining in the windshield area of the above cover had just decided to fall apart, and it was getting nasty stuff all over my bike. So, the cover came off:
The first step was clearing the patio of most of the leaves that had accumulated lately, lest they rot underneath the enclosure:
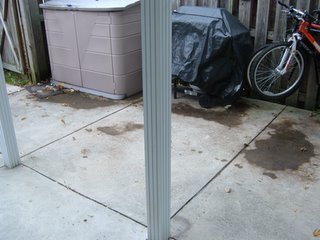
The next step was laying out the fabric enclosure of the Cycle Shelter:
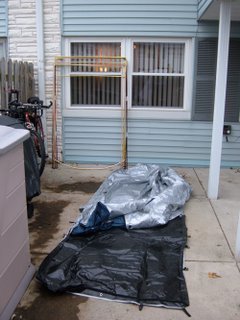
Those are the poles that act as internal support leaning against the side of the house. These are pretty much exactly like modern tent poles - a combination of aluminum and shock-corded fiberglass sections that snap together. They are labeled with a code that corresponds to the rest of the poles in each support. Although one set of poles in my shipment was missing its stickers, it wasn't hard to figure out which support they belonged to...The construction is very similar to a tent as well - it appears to be made of ripstop nylon with reinforced seams, a weather-resistant coating and a heavy-duty plastic "floor". I assembled the poles inside, as it was a pretty blustery 40 degrees outside. The poles slide into the fabric of the enclosure and are secured by a "pocket" at the pivot point and a hook-and-loop enclosure every couple of feet:

Now, it took me all of ten seconds to write that last sentence, but this was a serious pain in the ass. The poles fit TIGHT, and the hook-and-loop enclosures are industrial strength, but tiny enough that they are a pain to work with and kill your fingers. If you have obedient children or a petite mail-order asian bride, this would be the time to enlist their help. Overall, I would say assembly took me around two-and-a-half hours, start to finish.
Once you get the hang of assembly, it gets easier as you go. You are working with a big heap of fabric at first, but as you progress it starts to take shape and it is less of a chore to secure the poles.
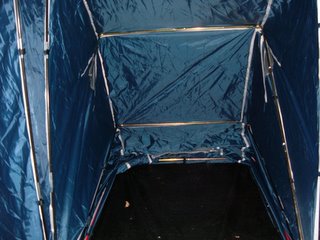
After getting the first half of the poles secured, I would recommend partially opening the Cycle Shelter to get the supports "seated" along the reinforced seams (I didn't do this 'till later, and it took considerable wrestling). After assembly, it should look something like this:
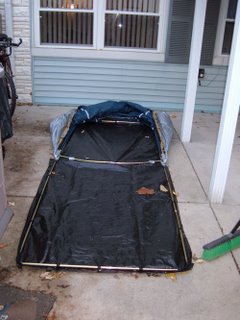
Then, you simply ride the bike onto the enclosure...
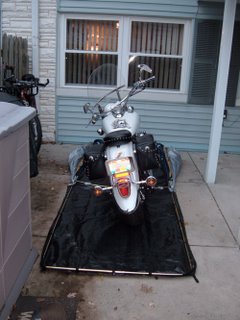
...and close it like a big clamshell.
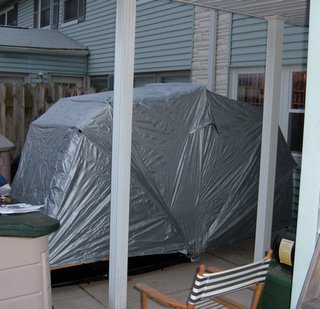
Sorry about the picture, but this thing is BIG, and I'm working in a pretty small space here. It's actually much bigger than I expected - I think you can see the peak of it over the top of my privacy fence. My condo association is pretty lenient, so I don't expect there to be any hassles, but if you lived in a hoity-toity development you might get some flack over this thing.
After you close it up, a series of clips sewn into the underside snaps onto the last support:
There are velcro flaps along the top & bottom edges of the enclosure that appear as if they wouldn't close very well, but when you snap the clips into place it actually lines up pretty easily. The are vents at the peak of the enclosure on each side as well as a large one at the front. The Bike Barn people also included an "anchor kit" that consisted of basic tent stakes, nylon cord and some funky sliding grommets that I couldn't figure out what I was supposed to do with (no directions for this part beyond "Use the anchor kit to secure the enclosure". Gee, thanks). As I have this on my concrete patio, I'm not going to worry about it anyway - I will take the manufacturer's suggestion and pick up some tube-shaped sandbags to place along the outer edges to keep it secure. I also purchased their locking option for an extra ten bucks, which consisted of an extra-long Masterlock padlock that I can't figure out where to attach. Regardless, after assembly it seems pretty silly, as a thief could easily slash the fabric to get the cover off. Oh well, it's a nice padlock for the price, I'll find something to do with it. I noticed on the Cycle Shelter web page that they no longer offer the padlock, but now they have an electronic alarm for $50 with purchase, as well as some titanic locking wheel-chock thing that costs $225 and wouldn't work for me anyway, since I have spoked wheels (besides, I already have a Kryptonite disc lock that has served me well for years). They also offer a heater kit that looks interesting. Maybe I'll email them and see if they'll give me a break on the price of a heater and an electronic alarm, since they weren't offered when I ordered mine.
So, I guess the question is, is it worth it? Only time will tell - if it last for ten years, then yes. I hope it last for a good long while, and for the price it should. It will be nice to not have to mess with a traditional cover after riding, and not having to wait for the pipes to cool down before putting the bike away (since the sides of the enclosure don't touch the bike). So here's the skinny:
Pros:
-Quick & easy to put bike away, no waiting
-More secure than traditional covers
-Won't blow off when it's windy
-(seems) Sturdy
Cons:
-Expensive
-Assembly is a pain, minimal instructions
-Much bigger than I expected
Overall, I saved $135 by going with the Cycle Shelter over the CycleShell. Knowing now about the assembly process and construction, it's kind of a wash - if you're a cheapskate like me and an afternoon of crawling around on your patio is worth saving the money, go with the Cycle Shelter. If you want it quick & easy or have an employer that's cool with you getting packages at work so you can save a few bucks on shipping, go with the CycleShell.
UPDATE 03/21/06: As jimmy mentioned in the comments, I originally got my product names switched around, so I fixed that. According to my referral logs, some people are finding this page when looking for product info on enclosures, so it also gives me a chance to do a follow up of my experience with the Cycle Shelter. I have had problems with the design of the velcro around the bottom of the enclosure - it potentially could form a tight seal, but only if you take a loooong time crawling around on the ground to make sure it is all lined up exactly right - I opened the enclosure to hook up a battery tender after a few weeks with a lot of rain, and there was a puddle of standing water in the bottom. It is made even harder by the fact that with sandbags weighing down the bottom, the enclosure is very taut, making the velcro especially hard to secure at the corners - I actually jammed a towel in the space at one corner after getting frustrated with messing with the velcro for ten minutes. I have also had problems with water collecting on top of the enclosure - The sides of the "arch" formed by the support poles isn't steep enough in the back to allow water to run off fast enough. I solved that problem by undoing the hooks on one side of the second support - this creates a slope that allows the water to run off. It solved the problem, but it's not something I should have to deal with. Taking those issues into consideration, I would probably recommend the CycleShell over the Cycle Shelter - it is obvious from looking at the photos on their website that these would not be issues with their design.
Home again, home again
One amusing story that just popped into my head:
My stepdad asked me if I wanted to take my golf clubs on vacation, since there was a course at the resort. Now, I'm not that big on golf, but my father was, as is my stepdad and several of my friends - so, I have a set of clubs & I'll play when asked, otherwise I wouldn't see some of my friends for an entire summer. Thing is, I'm pretty lousy. I originally learned with a set of my dad's old clubs, even though I'm left-handed and he wasn't. Someone gave me a hand-me-down set of left-handed clubs a few years ago and I improved from "downright dangerous" to merely "sucks major ass". Anyways, we went and paid the man at the course, and since we had a half hour to kill before teeing off he gave us some balls to take to the driving range to get warmed up. I have a huge 450cc driver that I got for free a few years ago (long story) that I've never been able to hit worth a damn, but I figure it's just the driving range, so I get it out. Right as we start teeing up, a couple of groundskeepers start driving down the left side of the range in a cart. In a few seconds they are waaaay out there, like a couple hundred yards away. I jokingly said to my stepdad, "Five bucks to the first one who can hit 'em". I reared back and swung, not really aiming for anything, and the ball LEAPS off the club. I mean, it was amazing. I drove that ball 300 yards if it was an inch. It was like I was John Daly, without the chain smoking or raging alcoholism. And the ball is rapidly homing in DIRECTLY on these two guys in the cart. Just when I am starting to say "Oh sh-" the ball lands a few feet RIGHT IN FRONT of their cart. If I had swung a half-second later one of them would be in the hospital. My stepdad is rolling with laughter, I was just glad they didn't turn around and beat me senseless with their sand-trap rakes. Of course, I didn't hit the ball that good again for the rest of the day... hell, I'll probably NEVER hit the ball like that again.
Stay tuned, I will be posting another project file in the next few days...
Saturday, November 12, 2005
Weather is here...
Made it to sunny FL okay. I have been up for about 40 hours straight in an effort to get my (usually nocturnal) internal clock in sync with everyone else. As I have been traveling all day and just ate my weight in fresh seafood & beer, it's off to bed...
Thursday, November 10, 2005
To a strange and distant land...
Wednesday, November 09, 2005
Tuesday, November 08, 2005
Wheelin' & Dealin'
Sunday, November 06, 2005
I got nuthin'
I did get the Mac hooked up, and am learning the in & outs - it's a very strange thing for me to feel out of my element when it comes to using a computer. Now, I don't claim to be a guru or anything, but computers have been a big part of my life for the past 25 years - from junior high, through college, and into my work. I am literally surrounded by dozens of computers at my desk at work:

Welcome, my friend, welcome tooo the machineeeeeen...
I put about as much actual thought into using a computer as a mechanic does when using a wrench, or a janitor does when using a broom - that is, none at all. It's just a tool that helps me do what I want to do. It gives me a whole new perspective to be apprehensive. I will do my best to remember it next time I find myself losing patience with someone I am trying to teach.
It's mostly fiddling around right now, and the stuff that's got me spooked is the little stuff - no taskbar at the bottom of the screen, minimize/maximize button in the wrong corners, etc. It will all work out with time. Oh, and I just noticed that the handy little "edit html" tools in Blogger are missing with the Mac web browser, so I'll have to try getting Firefox working again (I tried last night, but there's some bugs in the Mac version and I lost patience with it). Check back later in the week, there's more entertaining stuff coming, I promise. I snapped a few truly frightening "before" pictures of the office yesterday - I mean, seriously, you will lose all respect for me. Hopefully I can redeem myself with the "after"...
Saturday, November 05, 2005
Project Files: CRX
1991 Honda CRX
When I got out of school, I was driving a 1989 Firebird that was the biggest lemon I ever owned - it was costing me more in parts every month than most car payments. Since I was gainfully employed, I went out and leased a brand new Jeep Wrangler.
I liked the Jeep a lot, (especially in the winter, since I am usually branded an "essential" employee, and have to show up to work even during snow emergencies) but I was sick of making the payment after 4 years. So, when the lease was up, I set out to look for a cheap, reliable car that I could afford to pay cash for.
Now, even though I would love to drive a vintage Chevelle or C-10 pickup every day, in the real world it creates a host of problems - the cost of gas, repairs, and insurance & the need for a garage are just a few that I am not equipped to deal with right now. In my experience, "efficient & reliable" means Honda or Toyota. Since there are three Honda plants in my part of the state that employ thousands, even the most die-hard "Buy American" types around here hold Honda in high regard, and used parts abound.
It just so happened that a friend of mine had just bought his wife a new car - previously she was driving a 1991 Honda CRX that was her family's "spare" car. (They had three kids in college at the same time, so someone always needed a car). The good news is that since the car was only driven occasionally, it only had 60,000 original miles. The bad news is that since is was being used by college kids who didn't have a reputation for either driving skills or sobriety, it was dented & dinged just about everywhere. The last of the kids had just graduated, so the Honda wasn't needed anymore and was just taking up space. After some shrewd negotiating, my friend agreed to sell me the car for $800.
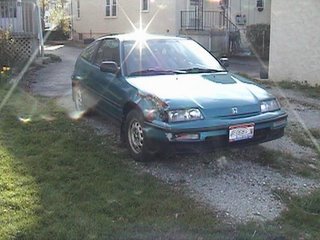
The CRX as it was delivered.
The first difficulty came the weekend I was to pick up the car - we were hit by a blizzard and the car was plowed under several feet of snow. While waiting for it to thaw, someone decided to smash the window and rip out the cheap stereo, also destroying the center console in the process. My friend lowered the price to $500 and told me to come pick it up while there was still something left.
There were two adantages to buying this car: 1.) due to the popularity of the CRX with the "Fast & Furious" crowd, repro panels were plentiful & cheap. 2.) I was working at a car dealership, so I had a source of tools & cheap labor for anything that was over my head. Over the next several months, I scoured the web buying the bulk of the parts I needed (fender, lights, center console, front bumper, misc. trim pieces, etc.)
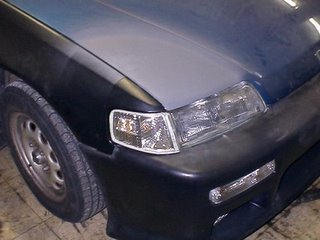
Repairing the hood, marker lights, & bumper.
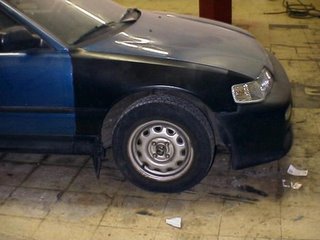
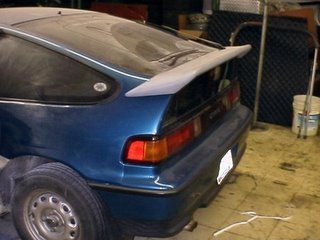
Rear spoiler was added.
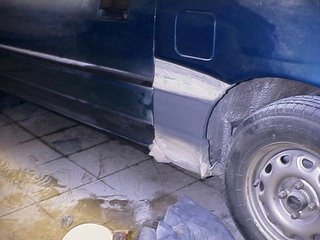
The CRX unibody frame has integrated drain channels for the sunroof models, which is what causes every single one of them to rust out at the left rear wheel well.
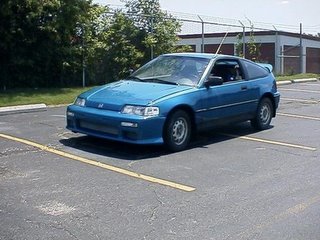
Just back from the paint shop. We did a lot of restorations at the dealership, so there was always someone willing to do a paintjob on the cheap to get their foot in the door.
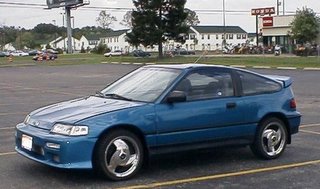
As it is now (minus a few layers of dirt). It desperately needed new tires, and I got a deal on a set of old stock 16" Progressive wheels that was too good to pass up - with no power steering it handles like a racing cart.
Wednesday, November 02, 2005
Land of the Midnight Sun
Anyways, Surly had a great post the other day about his unnatural attraction to junk - I am also afflicted with this disorder, but due to a lack of space for any more cars/motorcycles/aircraft carriers (as well as a serious effort to purge a lot of junk in the past year, lest I turn into this - scroll down), it has mostly taken the form of various hardware and sundry electronic items. With the new computer on the way, I have been inspired to re-organize my entire office/studio/workshop - I am planning to take some pictures of the truly staggering amounts of crap that I have in there, and post them here for you to gaze upon in wonder and horror. I went out today and picked up some data switches (of course, I forgot the cabling, so I'll have to go back tommorrow) and am excited to get started. I also plan to return to the home automation projects I abandoned last spring, and am hoping to start some weird projects with cameras that have been kicking around in my head for a while. Stay tuned...
Tuesday, November 01, 2005
Trick or Treat...
One observation I made - for almost 5 years I lived in one of the trendier neighborhoods in my city - meaning, "Let's build some overpriced 'boutiques' and coffeehouses around them, then we can rent these 80-year-old dumps for a grand a month to 'young urban professionals' using phrases like 'old world charm'". We hardly got any trick-or-treaters there, and they were usually whiny kids in overpriced store-bought costumes with soccer moms following behind them at 5MPH in the family SUV.
To be blunt, I moved into my new neighborhood for one reason: it's cheap. It's waaay out on the edge of the city, and it's definitely poorer than my old neighborhood. Not "run-from-your-car-to-your-door-before-the-crackheads-have-a-chance-to-hassle-you" poor, but definitely more blue-collar than the previous one. Now, the kids out here know how to do it. cheap-ass costumes (I swear, one kid just had a ratty bath towel safety-pinned around his neck), and pillowcases or trash bags to hold your loot. The cardinal rule: cover as much ground as you can, as fast as possible. Screw the sidewalks, run through the yards. Blurt out "TRICKORTREATTHANKYOU!" and start running before the candy hits the bottom of your bag. Some kids were even on razor scooters or skates to go faster. I was having flashbacks to my own childhood. It almost brought a tear to my eye.
Best costume: Three junior-high kids pretty elaborately made up as KISS. They had Gene, Paul and Ace, no Peter. I asked them how they were going to do "Beth". I don't think they got it.
The only bummer of the night was what my next-door-neighbor was handing out: juice boxes. JUICE BOXES?!?! Seriously, people, it's one night a year, and for kids, it's the second-greatest-holiday this side of Christmas. Ditch the apples and pennies and pony up for some decent candy. If those kids really are anything like me when I was a kid, that lady's gonna have a dozen smashed juice boxes on her porch tommorrow morning. But then, I was a bastard...

